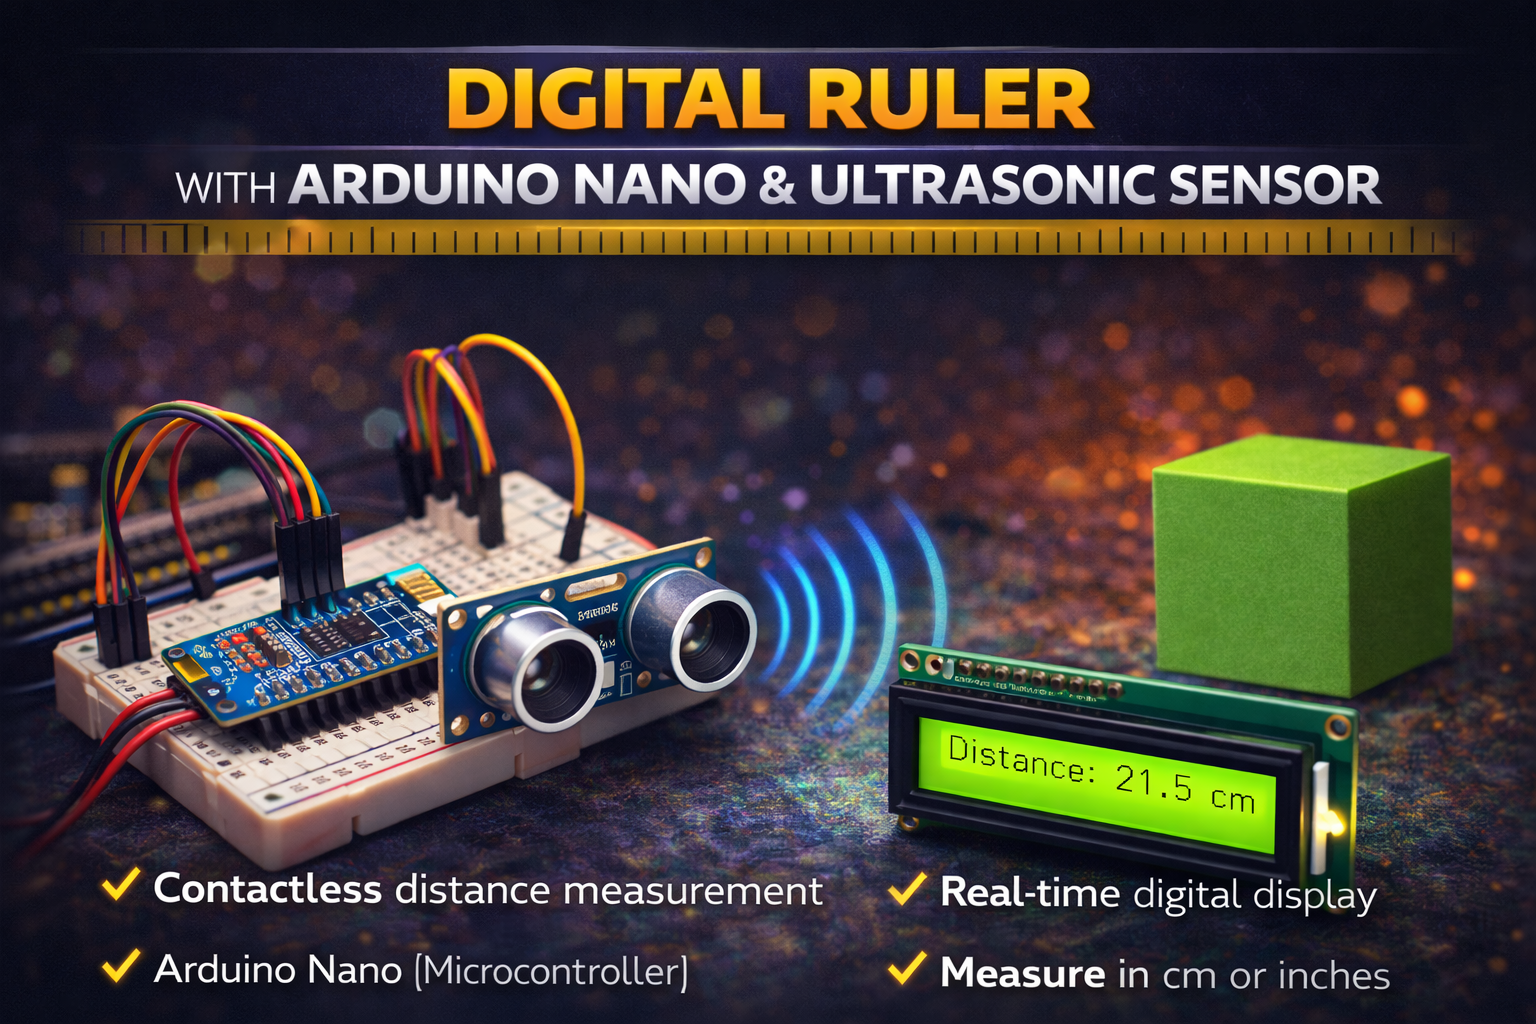
Call us 24/7+91-9867228252
PAVAN ELECTRO SOURCE: β€œEmpowering Innovation Through Electronics, Education & Technology”
Call us 24/7+91-9867228252

πŸ“ Digital Ruler using Arduino Nano & Ultrasonic Sensor


πŸ” Project Overview

This project is a Digital Ruler (Distance Measurement System) built using an Arduino Nano and an ultrasonic sensor. The system measures the distance between the sensor and an object and displays the measured value digitally.

The ultrasonic sensor emits sound waves, which travel through the air and bounce back after hitting an object. The Arduino calculates the time taken for the echo to return and converts it into distance in centimeters or inches.

The measured distance can be displayed on a 16Γ—2 LCD display or sent to the Serial Monitor for real-time measurement. This project acts as a contactless digital ruler, making distance measurement fast and accurate.


βš™οΈ How It Works (Short & Simple)

πŸ“‘ Ultrasonic Signal Transmission
The ultrasonic sensor sends out high-frequency sound waves through the Trig pin.

πŸ” Echo Detection
When the waves hit an object, they reflect back and are received by the Echo pin of the sensor.

⏱ Time Calculation
The Arduino Nano measures the time taken for the sound wave to return.

πŸ“ Distance Calculation
Using the speed of sound, the Arduino converts the time into distance using a formula.

πŸ–₯ Display Output
The calculated distance is shown on a 16Γ—2 LCD display or the Arduino Serial Monitor.


πŸ› οΈ Hardware Used

  • Arduino Nano
  • Ultrasonic Sensor (HC-SR04)
  • 16Γ—2 LCD Display (Optional)
  • Potentiometer (for LCD contrast)
  • Breadboard
  • Jumper Wires
  • USB Cable / 5V Power Supply

✨ Key Features

βœ” Contactless digital distance measurement
βœ” High accuracy using ultrasonic technology
βœ” Controlled by Arduino Nano microcontroller
βœ” Real-time distance display
βœ” Simple and low-cost electronic project
βœ” Compact and portable measuring system
βœ” Easy to expand with display or wireless modules


πŸ“ˆ Applications

πŸ“ Digital measuring tool
πŸ€– Robotics obstacle detection
πŸš— Parking distance measurement systems
🏭 Industrial distance monitoring
πŸŽ“ Educational electronics projects
πŸ“¦ Object distance and positioning systems


πŸš€ Future Scope

πŸ“± Add Bluetooth module for smartphone display
πŸ“Š Integrate OLED display for better graphics
πŸ”Š Add buzzer alert for minimum distance warning
πŸ“‘ Connect to IoT cloud monitoring system
🎯 Improve accuracy using advanced sensors
πŸ“ Add unit switching (cm / inch) button


πŸ‘ Advantages

βœ” Non-contact distance measurement
βœ” Fast and accurate readings
βœ” Low power consumption
βœ” Easy to build and program
βœ” Affordable components
βœ” Suitable for beginners and students


⚠️ Precautions

⚠️ Keep the ultrasonic sensor facing the object directly
⚠️ Avoid obstacles that absorb sound waves
⚠️ Ensure stable 5V power supply
⚠️ Do not block the sensor transmitter and receiver
⚠️ Maintain proper wiring connections to prevent errors

πŸ’‘ 3Γ—3Γ—3 LED Cube using Arduino Nano


πŸ” Project Overview

This project is a 3Γ—3Γ—3 LED Cube built using 27 LEDs arranged in a cubic structure and controlled by an Arduino Nano microcontroller. The cube creates dynamic lighting patterns and animations by controlling individual LEDs through multiplexing techniques.

Each layer of LEDs is controlled independently, allowing the system to generate 3D lighting effects such as waves, blinking layers, rotating lights, and random patterns.

The Arduino Nano acts as the brain of the system, sending signals to the LEDs in rapid sequences to create visually appealing animations.

This project is widely used for learning microcontrollers, LED control techniques, and basic electronics design.


βš™οΈ How It Works (Short & Simple)

πŸ“± Microcontroller Control
The Arduino Nano controls all LEDs by sending digital signals to different LED columns and layers.

πŸ’‘ 3D LED Structure
The cube contains 27 LEDs arranged in:

  • 3 Rows
  • 3 Columns
  • 3 Vertical Layers

This creates a 3Γ—3Γ—3 cube structure.

πŸ”Œ Multiplexing Technique
Instead of controlling all LEDs individually, the system activates layers one at a time very quickly, making it appear that multiple LEDs are glowing simultaneously.

πŸŽ‡ LED Animation Patterns
The Arduino program generates different lighting effects such as:

  • Layer-by-layer blinking
  • Vertical light movement
  • Random LED patterns
  • Wave animations
  • Cube rotation effects

⚑ Power Supply
The cube is powered through the Arduino Nano via USB or an external 5V power supply.


πŸ› οΈ Hardware Used

  • Arduino Nano (Microcontroller)
  • LEDs (27 pieces)
  • Resistors (220Ξ© or 330Ξ©)
  • NPN Transistors (for layer control)
  • Breadboard / PCB
  • Connecting Wires
  • USB Power Supply
  • Soldering materials

✨ Key Features

βœ” 3D LED cube structure with 27 LEDs
βœ” Controlled using Arduino Nano microcontroller
βœ” Generates multiple LED animation patterns
βœ” Uses multiplexing technique for efficient control
βœ” Compact and visually attractive electronic project
βœ” Excellent beginner-friendly microcontroller project
βœ” Can be expanded for larger LED cubes


πŸ“ˆ Applications

πŸ“š Electronics learning project
πŸ€– Microcontroller programming practice
πŸ’‘ Decorative LED lighting system
πŸŽ“ Engineering and robotics demonstrations
πŸ§ͺ Educational STEM projects
πŸ–₯️ LED animation experiments


πŸš€ Future Scope

πŸ“‘ Add Bluetooth control using HC-05 module
πŸ“± Create a mobile app to control LED patterns
🎡 Sync cube lights with music using sound sensors
🌈 Upgrade to RGB LEDs for colorful animations
πŸ“Š Add custom pattern control through PC software
πŸ”† Expand to 4Γ—4Γ—4 or 8Γ—8Γ—8 LED cube systems


πŸ‘ Advantages

βœ” Simple and low-cost electronics project
βœ” Helps understand multiplexing and LED matrices
βœ” Improves Arduino programming skills
βœ” Visually attractive lighting effects
βœ” Compact and portable design
βœ” Easy to modify and expand


⚠️ Precautions

⚠️ Use proper current-limiting resistors for LEDs
⚠️ Ensure correct LED polarity while assembling the cube
⚠️ Avoid short circuits during soldering
⚠️ Secure the LED structure properly to prevent bending
⚠️ Do not exceed the Arduino Nano current limits

Search for products

Back to Top

Product Enquiry

Product has been added to your cart
Compare (0)